Inside My Homelab: Architecture, Services, and Future Plans
Introduction
As a tech enthusiast, building a homelab has been one of my most rewarding projects. It’s not just about experimenting with new tools—my homelab serves practical purposes, from managing my own data to running automation services.
For hardware, I repurposed my old laptop, which has an 8-core CPU and 12 GB of RAM. On the software side, I use NixOS for its reproducibility and Docker Compose for managing services efficiently.
In this post, I’ll take you through the architecture of my homelab, how the components interact, and the services I rely on to keep things running smoothly.
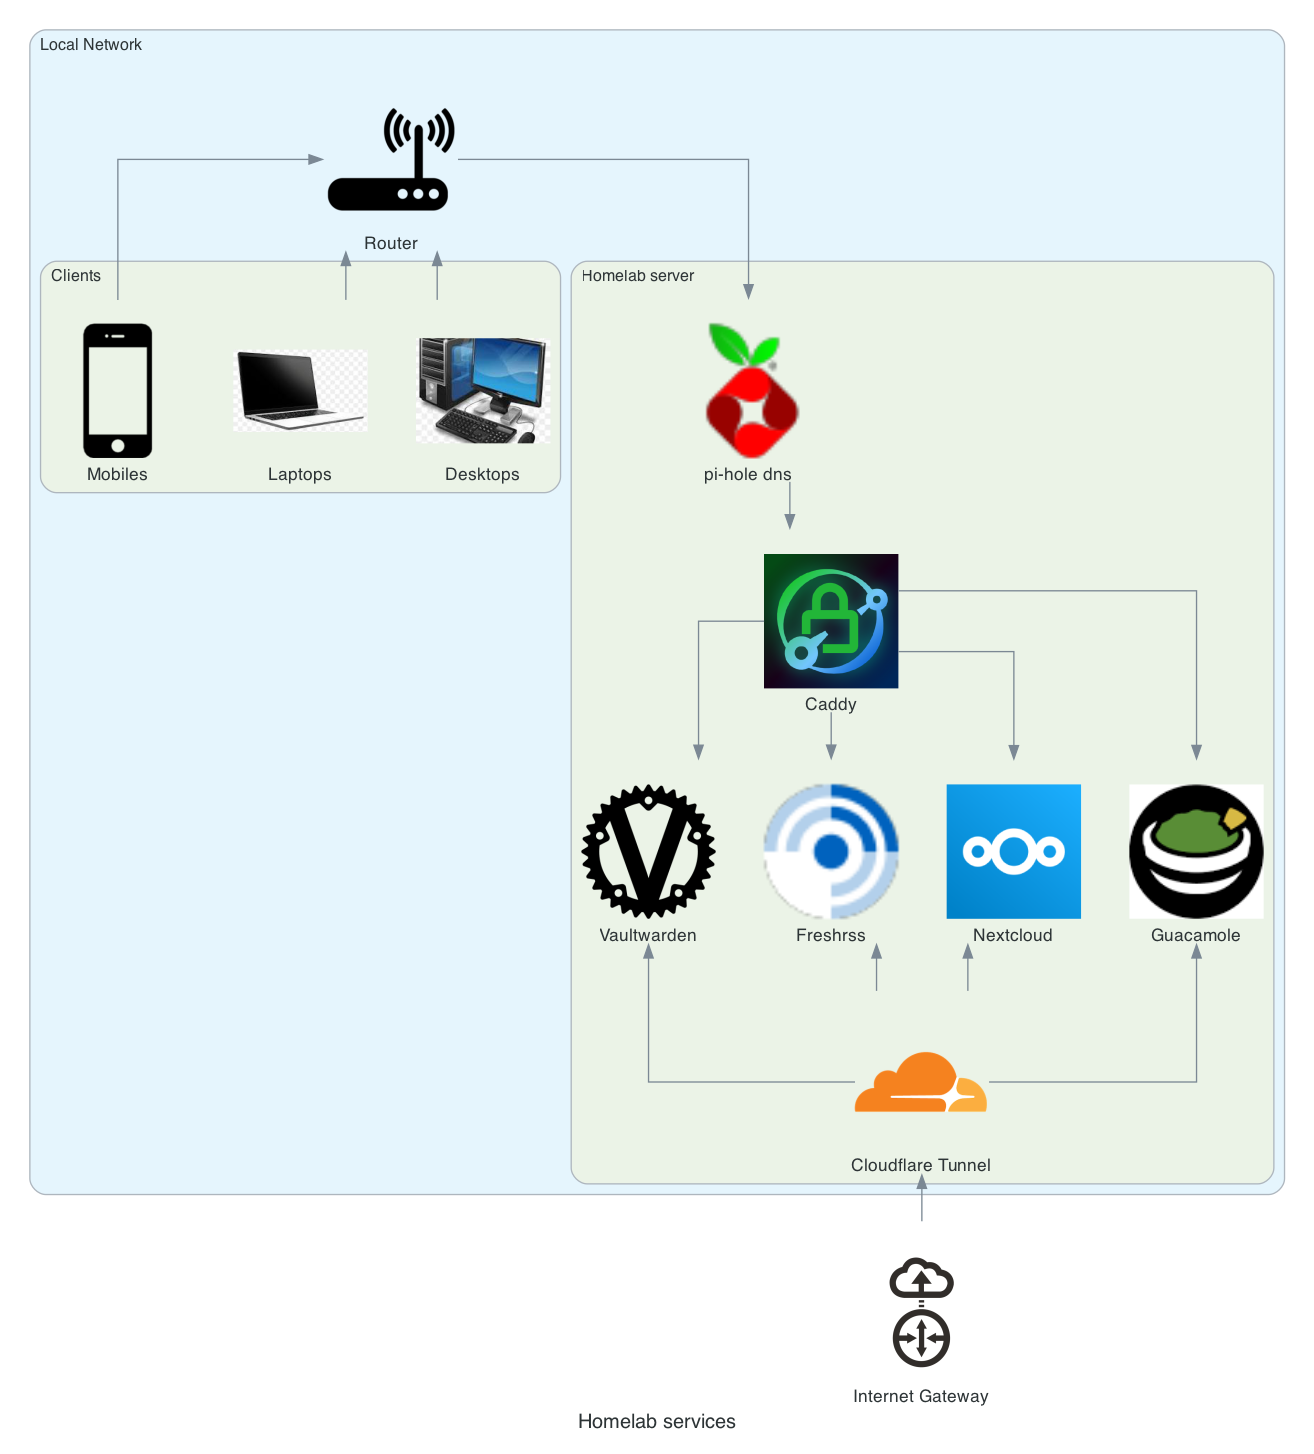
Architecture Diagram

Components
1. Pi-hole (DNS)
Pi-hole is commonly used to block ads and trackers across networks, but I also use it to set up custom DNS for accessing services under the *.box domain. By configuring this DNS on my router, all devices connected to my network can access my services using custom domains rather than IP addresses.
2. Caddy
Since I use the *.box domain in Pi-hole, Caddy acts as a reverse proxy, routing requests to the appropriate services. It provides HTTPS support and helps me centralize service access.
-
Docker Setup:
I run Caddy on Docker, using an external Docker network calledpublic. -
Benefits:
- I only expose ports 80 and 443 to the host machine.
- Internal services communicate via Docker hostnames and ports, eliminating the need for additional open ports or duplicate configurations.
3. Cloudflare Tunnel
Cloudflare Tunnel allows me to securely expose my services to the internet without requiring a static IP or port forwarding on my router.
- Key Features:
- Adds an extra layer of authentication when exposing services.
- Free-tier access is sufficient for my needs.
4. Vaultwarden
A self-hosted password manager that helps me securely store passwords and access them across all my devices.
5. Freshrss
A self-hosted feed aggregator that collects updates from websites, YouTube, and other sources, helping me stay informed without distractions.
6. Nextcloud
A self-hosted cloud solution for file storage, contacts, calendar management, and more.
7. Guacamole
A remote desktop gateway that allows me to access my systems securely from anywhere.
Why I Built This Homelab
1. Privacy
I value control over my data. Self-hosting services like Vaultwarden and Nextcloud ensure that my information stays with me, not third-party providers.
2. Learning and Experimentation
Setting up and maintaining these services has been a great way to learn about:
- Networking fundamentals.
- Reverse proxy configurations.
- System administration and automation.
Future Plans
I’m always looking to improve my homelab. Here are some of the goals I’m working toward:
1. Monitoring
Adding Prometheus and Grafana for detailed performance monitoring and logging.
2. Backups
Automating encrypted backups and securely storing them in the cloud.
3. Authentication
Setting up SSO (Single Sign-On) for all services using Authentik.
4. Infrastructure as Code
Automating service deployment with Terraform and Ansible to reduce manual work.
5. Expanding Services
- Hosting a web archive.
- Adding media services like Jellyfin.
- Exploring IoT integrations for home automation.
6. Kubernetes
Transitioning from Docker Compose to Kubernetes for improved scalability and management.
Conclusion
Running a homelab is both challenging and rewarding. It gives me complete control over my digital life while serving as a platform for continuous learning and growth.
If you’re thinking about starting your own homelab, I highly recommend taking it step by step—start with a basic setup and build on it as you gain confidence and experience.
What services do you run in your homelab, or what would you include in yours? Let’s share ideas in the comments!